
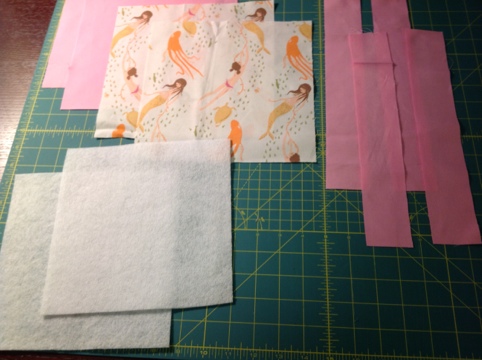
Begin by cutting all of the fabric. I love using my self-healing mat for these straight lines. If you do much sewing, I highly suggest one. It makes cutting so much faster.
2 squares 9×9 for the exterior
2 squares 9×9 for the interior
2 squares 8×8 of fusible fleece (or medium to heavy interfacing)
4 rectangles 2×12 for the straps (or use 1/2 inch ribbon)
When you adhere the fusible fleece to the lining, you will want to begin by centering it with the sticky side facing the wrong side of the fabric. I decided on the fusible fleece because I wanted to add a little substance but didn’t want to deal with batting.

When you iron the fleece, you will want to iron on the fabric side. This will keep the material from puckering.

Before sewing, you will want to prepare the straps. This method is for when you use fabric. You could also use ribbon to save some time. The folding is the same when you make bias strips. I didn’t cut these on the bias, but it would work just as well either way.
You will want to begin by ironing one of the short ends of each strip over about 1/4 inch to keep one end closed when it is all finished. I try to remember to do this first, but often forget and have to do it at the end. Not a problem.

First, iron it in half to give you a center fold. Second, you will fold in each side to meet in the center and press well. Third, iron it down the center again with the edges closed in the center.

A note about ironing: you should move the iron very slowly and let it sit still to give it a good pressing. If you move it around a lot, it won’t hold the crease very well making it more difficult to sew. Try to give it 3-5 seconds in place before moving it to the next spot. This is true when you iron clothes as well.

To sew the straps, I suggest using a foot for edge stitching. You are looking for a foot that has a guide in the middle that you can line up on the edge of the fabric then move you needle position over so that you can stitch close to the edge.
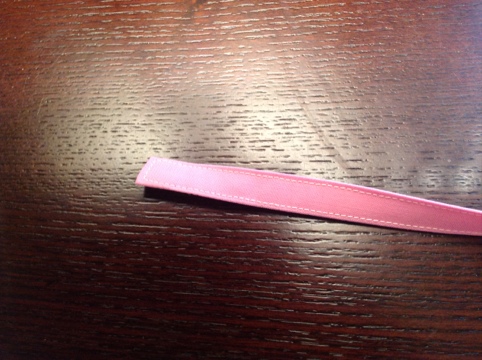
Begin stitching at the raw edge down one side, turn around the closed end, then stitch back along the other side. Back stitch at the start and stop. Do this for each of the straps.

Now you will attach the straps to the lining. You will line them up on the right side of the fabric. Start lining them up about 1 1/2 inches in from the end.

You will want to sew the straps to the fabric at 3/8 inch to keep the stitching hidden when you join it to the exterior fabric at 1/2 inch.

Now you get to sew it all together. You will sew the lining right sides together. Leave the top open, and leave a space about 4 inches wide open at the bottom to use to turn it around once you attach it to the exterior. Back stitch at the ends.

Now you will do the same for the exterior, but do not leave an opening in the bottom. Back stitch at the ends.

Press open the side seams at the top and clip the bottom corners.

Turn the exterior right side out and stuff it in the lining so that the tops line up. The fabric will be right sides together.
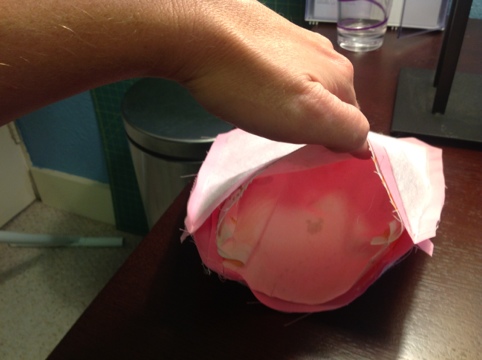
Now you will sew them together. Be sure to keep the side seams lined up and sew around the top at 1/2.

Use the space in the bottom of the lining to pull the exterior out. Use a pin or pointed tool to poke out the corners.

It should look like a bag finally! Sew the turning hole closed in the bottom of the lining. You can do it by hand and it will look beautiful. Or, you can be quick and sew it closed with your machine. I’m going for quick. A stuffed dog named Bingo is the only one who will see it up close.

Almost finished! stuff the lining inside the bag and press the top edge. The last step is to edge stitch around the top. Going over the straps again will help to secure them.

Tie off the loose threads and tie it on to the bike! You are ready to ride.


Love how detailed this tutorial is — the pictures are really helpful as are all the little tips!
Thanks Calarri! I’ll be making bags for the kids this week!